
(1700 Words)
The simplest press is a single stage press.
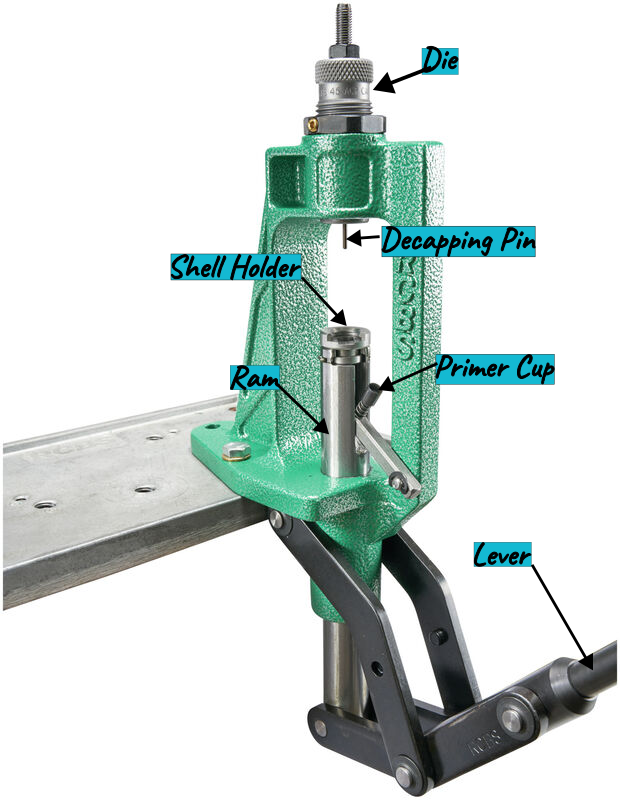
When starting with range brass, selected for the caliber you wish to reload, you start with an inspection. Then you deprime/decap the case.
You select the correct shell holder for your cases. For 5.56×45 it is a #4 shell holder. This is installed at the top of the ram with gentle pressure.
A decapping die is placed in the top plate and adjusted properly. When you bring the lever down, the ram goes up. The decapping pin then slides through the flash hole, and the pin then presses the primer out of its pocket.
When you raise the lever, the ram goes down and you can remove the case.
You repeat this process for each case you have to process.
You then clean your brass. After it is cleaned, you bring it back to the press. You install a sizing die at the top. You then lubricate the case, lower the lever which moves the ram upwards, forcing the case into the sizing die. When you raise the lever, it pulls the case out of the die, and you can then remove the case from the shell holder to process your next case.
You know go through the process of inspecting, sizing, and preparing your brass to use.
Your brass goes back through this press once more. This time you place the case in the shell holder, raise the ram, put a primer in the primer cup. Lower the ram, which pushes the primer into the case, seating it firmly.
The case comes off the press.
You place the seating die in the press and adjust it correctly. Then you charge the case (put the right amount of powder in the case), put the case back in the shell holder. Put the bullet in the mouth of the case, raise the ram to seat the bullet.
You remove the case and do the next case.
If you have a crimping die, then you run each case through the press one more time.
At the end of this last pass, you have a cartridge ready to feed through your freedom seed shooter.
Tool change verse Driving to a new location
Let’s say you want to drill and tap a hole pattern in an object with your mill. Each hole has a specific location. At each hole, you have to spot drill, drill, chamfer, and tap the hole.
Spot drilling is done with a spot drill, which is short and very stiff. You use this just to make a small dimple for the actual drill. The hole is then drilled with a twist drill. Depending on the object you are drilling, you may or may not need to drill to a specific depth. You use a chamfering tool to remove the sharp corner on the hole you just drilled. Finally, if you are power tapping, you put the correct tap in and tap the hole.
If your hole pattern is 6 holes, you would have to make 4 tool changes per hole, or 24 tool changes in total. I have done hole patterns exceeding 60 holes.
The other option is to put the spot drill in to the toolholder and spot drill all the holes in the pattern. Then change to a twist drill and drill all the holes. Switch to the chamfering tool and chamfer all the holes, and finally tap all the holes.
There are reasons in machining to do all those tool changes. Mostly when driving to a known position is difficult.
When you have a single stage press, you are spot drilling all the holes, then drilling all the holes, and then chamfering all the holes before finally tapping all the holes.
What if you can quickly change tools, though? That would be a game changer.
Turret Press
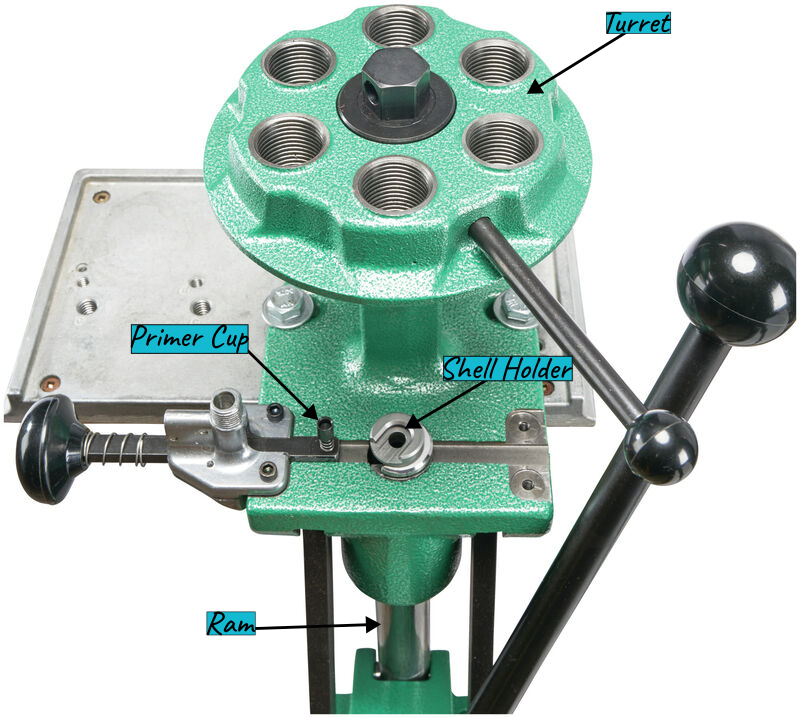
This turret press has the same primary features as the single stage press. It has the lever, ram, shell holder, die holder, primer cup. It can be used exactly like a single stage press with one exception, the priming system.
You fill a tube with primer and put it on the stand. When the ram is up, you can push the knob to the right, which will take one primer from the tube and slide it into the ram, under the shell holder. When the ram is lowered, the primer is seated.
That’s it.
But you can now have more than one die at the ready.
Now you can put your decapping die, sizing die, powder charge/mouth flair die, bullet seating die, and crimping die in the turret plate, at the same time.
Now, you use the turret press as a single stage press and decap/deprime all your cases. You clean your cases, you inspect your cases and have cases ready to go.
Now you are ready to do some reloading. You put the case in the shell holder. You raise the ram into the sizing die, you lower the ram and seat the primer. You advance the turret by one position, bringing the powder charging die/mouth flair die into position. You raise the ram and pour your measured powder through the charging die. You lower the ram, place a bullet in the mouth of your case, advance the turret. Raise the ram and seat the bullet. Lower the ram, advance the turret. Raise the ram to crimp the bullet in place.
Lower the ram and remove your finished cartridge.
This particular press does not advance the turret automatically. Lee makes one that does. I’ve used the Lee press and with the right equipment, it makes cartridges quickly.
The “right equipment” has to do with through the die powder charging abilities.
More, Faster!
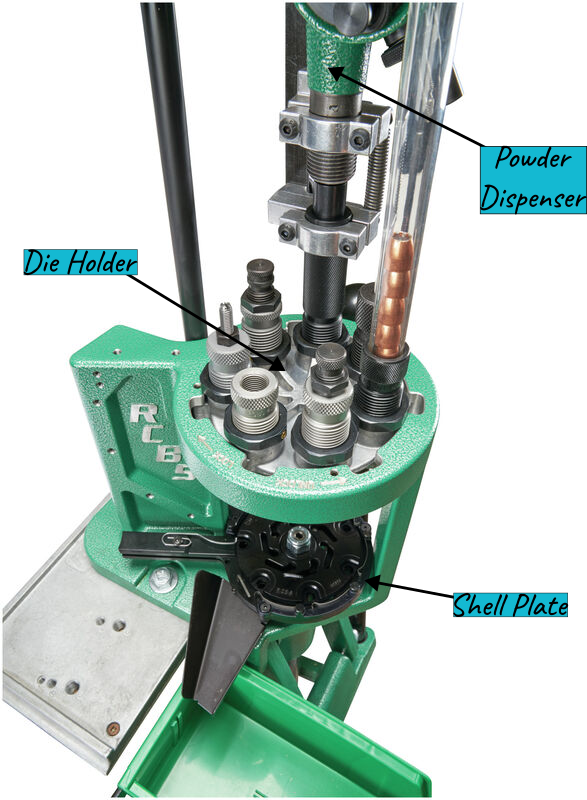
This is a progressive press. With this press, you put all your dies in place, you make all of your adjustments. When everything is perfect, you are ready to begin.
You insert a case into the shell plate. You lower the lever and the entire shell plate moves up. That case is deprimed/decapped.
When you lower the ram, the shell plate rotates and as the ram reaches the bottom, a primer is seated into the case.
You put another case into the shell plate, now when you lower the lever the entire shell plate moves up. At the top of the stroke, the first case is sized, the second case is deprimed/decapped.
When the lever is raised and the shell plate lowered, it advances once again. The second case is primed.
You insert still another case into the shell plate. You lower the lever and the entire shell plate moves up again.
This time, the first case triggers the powder dispenser to dispense a powder charge into the first case. The second case is sized. The third case is deprimed/decapped.
Lower the shell plate, which advances the shell plate. The third case is primed.
Insert case number four. Raise the shell plate.
Case number one is tested to make sure it has the correct powder charge.
Lower shell plate, put another case in.
Case number one has a bullet placed in its mouth.
The next station seats that bullet.
The next station crimps the bullet in place.
As the shell plate is lowered, that first case is pushed out of the shell plate and into your finished bin.
From this point forward, every cycle of the lever delivers one completed cartridge to you.
For most progressive presses, you can buy extras for the press which add motors to do many things. Mechanical extras that take a bin of bullets, orients them and drops them down a tube to be carefully placed in a case mouth. The same type of thing that orients and drops cases into a tube to place cases into the shell plate automatically.
The primer tubes are designed to be quickly changed out so you can keep on going.
I believe that there is actually a version that motorizes the raising and lowering of the shell plate.
Regardless, a progressive press will make many cartridges very rapidly.
Response to Comments
Curby says his turret press does not automatically advance. He repeats the warning: Don’t do distracting things when reloading. Focus on what you are doing. “Think y’ll”
Some turret presses have an option to advance automatically, some do not. The Lee turret press has an auto-advance feature, but only has four stations. It is also not as rigid as other turret presses.
it’s just Boris asks what the difference is between a turret press and a progressive press.
See above.
RHT447 gives us a pointer to the history of Col. Berdan and Col Boxer.
Berdan primers. I’ve seen some Yootoob videos on how to convert Berdan primer pockets over to Boxer with the aid of a drill press. Yeah, still not worth it.
Saving money. Nope. However, your cost/round is much less.
Music. “Task” music, like the example in my earlier comment. No Rock ‘n Roll, no lyrics.
Slow Joe Crow notes that different brands of primers are reported to have different levels of sensitivity.
If your press manufacture tells you to use a particular brand of primer, it is best to use that brand.
You said that on 5.56 with current prices you see between $100 and $150 in savings. That’s 15-20%. Not a small savings. But you have to shoot a lot of it to justify the tooling. What kind of savings are you seeing on the currently dirt common 9×19?
Some thots. Yes, I have been reloading for decades, and have acquired a lot of experience and general knowledge. Still, that only makes me a true expert on my stuff. Hopefully others will find some bits and pieces of that useful.
Single stage press. By all means, start here. Learn each reloading step in detail. Even today, I do 95% of my reloading on my RCBS Jr. that I bought in 1976. (Side note– I bought it mail order while stationed in West Germany. Called my dad back home and told him to expect a big heavy box, and to just set it in the basement and I would open it when I got back in two years.)
One of the big advantages of a single stage press is that I can have it up and running for any caliber in under 10 minutes. The same for adjustments to accommodate some new bullet, or new gun chamber length. It is also easy to spot/correct a mistake. It stays mounted to my work bench. I usually load in batches of 50 rounds because that is what my MTM ammo boxes hold. I find it handy to use stick-on file label on the box tops to keep a record of times fired and times trimmed.
The one progressive I own in an old LEE 1000 three station. It is mounted to a chunk of ¾” thick plywood that I clamp to my bench when I use the press. I only use it to load handgun ammo, and then only for 100 rounds or more. It is a love/hate relationship. (Yeah I know, get a Dillon). A progressive press takes more time to set up and properly adjust, although quick change tool heads do help. Lord help you if there is a problem at one station, especially if components are being fed by the press. Now you have to shut off the feeds, then clear all the stations to find and correct the problem. It can be a time consuming PITA. I run my tired old LEE as follows—
I don’t size or de-prime because 1) I want to clean the primer pockets and 2) the primer residue would build up under the shell palate and have to be cleaned out.
I set it up to prime only, feeding both cases and primers. Simple operation, works great.
I then set it up with powder charge (auto) at the first station, bullet seat (manual) at the second, and crimp at the third. Also works great, much less to go wrong. Once you are at this point, getting a loaded round for each pull of the handle, it is MOST satisfying. I actually find it easier to stay focused because there is a lot going on—case feed, powder feed, bullet placement, loaded round ejection. Like I said, anything less than 100 rounds, and it’s back to the single stage press.