
(3650 words)
When a cartridge is fired, the powder burning creates high pressures. 9MM has a maximum average pressure of 35,000psi. A 7.62×51 NATO has a maximum pressure of 60,200psi. These pressures are high enough to move metal.
1/16″ to 3/5″ brass pipe fittings and standard nipples can be used up to 300psi. In certain applications, the pressure can go to 1000PSI, maybe.
What this means is that if the cartridge case is not supported, it will burst under nominal pressures. This process of the case expanding is a “good thing”. It acts to obturate the flow of gasses around the case and out the breach.
For a cartridge to fit into the supporting chamber, it must be slightly smaller, in all dimensions, than the chamber. If it was an exact match, the round would be difficult to chamber.
When the round is fired, it “fire forms” the case to match the chamber. When the pressure goes down, the metal moves back towards its original size, slightly. This allows it to be extracted from the chamber, more easily.
To help with the extraction process, cases are often designed with a slight taper. When the cases are extracted, as soon as they move back even a small amount, they lose contact with the chamber walls.
When we speak of “straight walled” cases, we typically include these slightly tapered cases.
When the size of the diameter of the bullet is significantly less than the diameter of the case, the case needs to be “necked down”. This creates a “bottleneck cartridge”.
A bottleneck cartridge has pressure pushing the brass forward when the round is fired. This causes the case to stretch a little.
Headspacing
Headspacing is the art of placing the bullet exactly where it needs to be in the chamber, relative to the start of the rifling. How that is done is different for different types of cartridges.
When we are trimming a case, we are adjusting the headspacing for the finished case. We are also preparing the case for crimping.
How a round is headspaced has changed over the decades as technology has been improved. Looking at the introduction of metallic cartridges, we find that almost all metallic cartridges were “rimmed”.
There was an excellent reason for rimmed cartridges. The technology was sufficient to produce rimmed cartridges of consistent length.
The headspace was measured from the top of the rim. If the rim was a little too thick, this was not an issue. If it was a little too thin, still not an issue. If the distance from the face of the rim to the mouth of the case was too short, the case would be rejected and remade. If it was too long, the case was trimmed to length.
Technologically, this was a simple process. As many of the early cases were straight wall cases, there was very little stretching of the case. All of this meant that a case could be reloaded until it failed and not exceed specifications.
The next method of headspacing is to space off the mouth of the case. 9MM and .45ACP are examples of this method. As long as the case is long enough to reach that ledge and not so long as to keep the breach from closing, the round will be headspaced correctly.
Again, with cases being straight walled, there is very little stretch.
Which brings us to “modern” bottleneck cartridges. These are spaced from a theoretical location on the shoulder of the case.
There is no simple method to measure this. We have to trust in our tools, or we have to invest in special gauges to measure the distance from the shoulder to the mouth of the case.
Our resizing dies will “bump” the shoulder back into position.
Parts
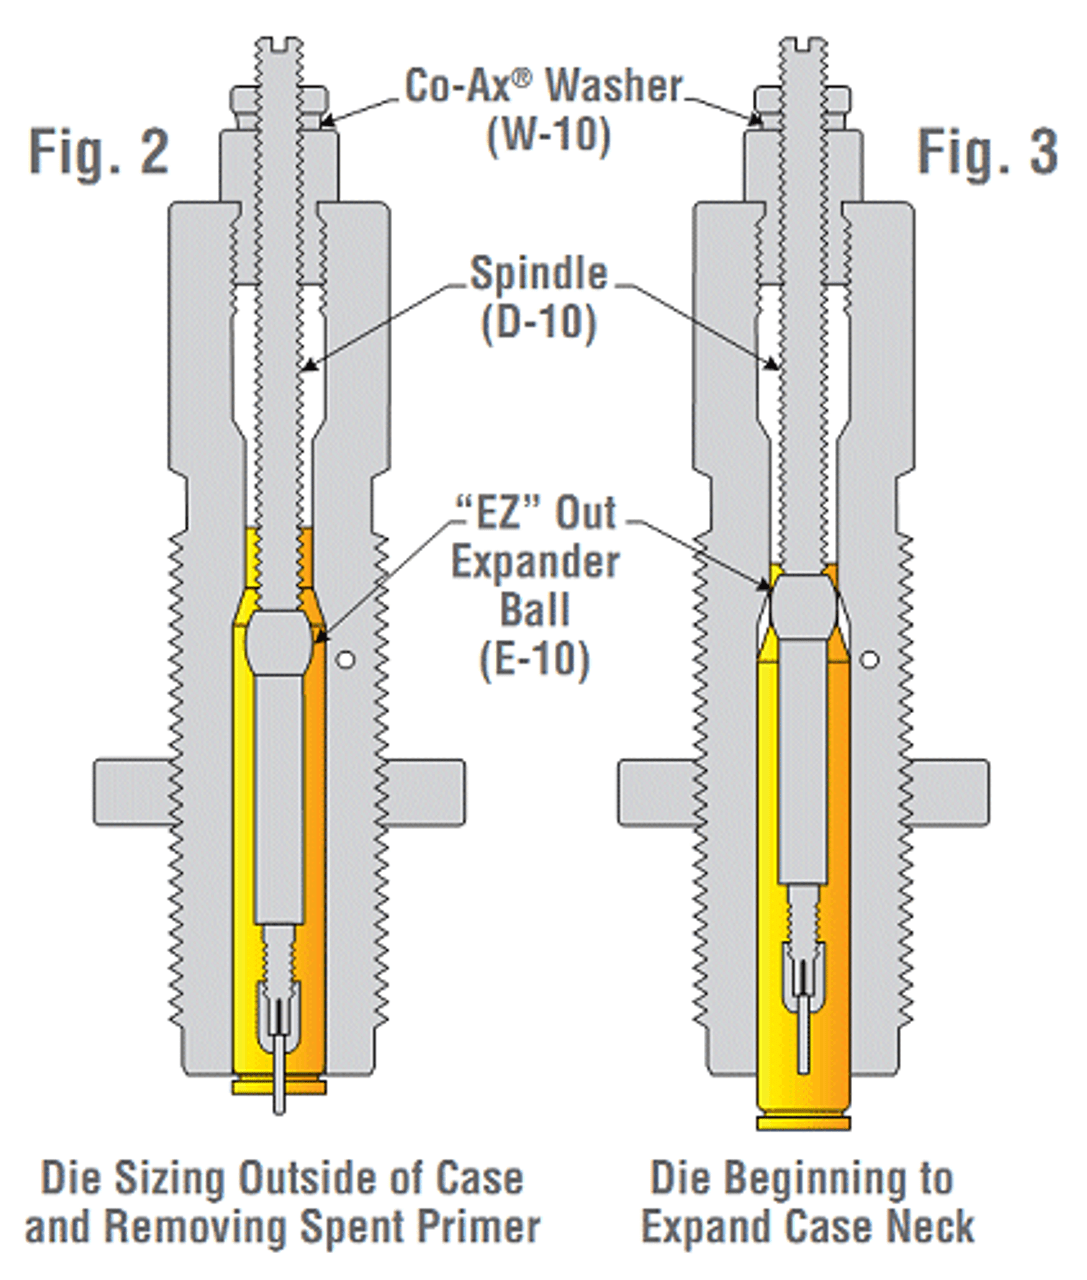
There is an error in Fig. 3. The decapping pin and the rod that holds it is shown as being shorter than in Fig. 2. It is the same size both when the case is being inserted and when the case is being removed. The “EZ” Out expander ball does float on the rod, so it does move up and down.
Not all resizing dies have a floating expander ball.
The right diagram, Fig. 3, shows the case being inserted. As it is inserted, the mouth is opened enough for the case to move over the rod. If the case mouth is crushed, this is not possible. If the case mouth is just out of shape, it will be reshaped in this process.
As the case moves further into the die, the mouth reaches the expander ball, which moves upward until it reaches its limit of travel. When the ball can no longer move up, the case mouth is forced over the expander ball. This sizes it correctly for the bullet.
Next, the mouth enters the throat of the die. There, it is squeezed back into shape and dimension. This also crushes the neck too tight for a bullet to be seated.
As the case is pulled out of the resizing die, the expander ball will pass through the mouth a second time, expanding it to take the bullet.
Full Length v. Neck Sizing Dies
Above, we described how brass is fire formed to exactly match the size of your rifle’s chamber. Imagine, if you would, that you could size all of your brass to exactly fit your chamber. This could give you more consistent results, depending on your reloading abilities.
Well, you can. The goal of resizing a case is to make sure you can seat a bullet correctly. If the mouth has opened up too much, the bullet will just slip into the case. If the mouth isn’t wide enough, the bullet won’t set easily, and you could damage the mouth of the case.
A full length resizing die takes care of all of that by bringing the case back to standard sizing.
If you know that the completed cartridge would be fired only from the same rifle, you don’t have to bring the case back to standard size. You just have to make sure the mouth is sized correctly to seat the bullet.
This is what a neck sizing die does. The body of the die is just a little oversized. This still supports the case, but it doesn’t move any metal. At the top, where the neck is sized, that actually does squeeze the neck smaller. And the expander ball still expands the mouth to the correct size for your bullets.
Having done this a couple of times, it is much easier on me and much easier on the brass. The brass will likely survive longer as there is less stress to the brass.
As a beginner, stick with full length resizing dies. It really is easier at the start.
How To Make Resizing Miserable
When things are going well, it is a simple up-down motion of the lever, loading a case each time. It is a type of zen.
To make your life much more interesting, get a case stuck in your resizing die.
When this happens, your life is going to become more complex. Since a reloading die costs between $30 and $300, you would rather not damage your die. Absolutely the best way to not damage your die is to never get a case stuck.
This means properly lubricating your cases and pay attention as you press the case into the die.
Your die is polished and wonderfully smooth as it comes to you. If you care for it, it will stay polished and smooth. Don’t let them rust.
Your die likely comes with a thin coat of rest prevention oil from the factory. You need to clean all of that oil off the die. You want to then make sure that the moving parts, have a thin coat of oil to prevent them from rusting.
The inside of the die will be lubricated by your cases. As you insert the case, a small amount of lubrication will be transferred to the walls of the die. You want to keep that layer as thin as possible without getting cases stuck.
I use Redding Imperial Sizing Die Wax. The process I use is to take my index finger and dab it onto the wax. I then rotate the case with my offhand and spread the wax on the case with my primary hand. I make sure that the wax gets over the complete case.
This is vital at the start of a reloading session. Your die is going to have no lube in it when starting a reloading session. This is the time when you are most likely to get a case stuck.
Do not a “more the better” attitude to size lubrication. The right amount is the correct amount.
Place your lubricated case in the shell holder and smoothly lift the ram. You should be able to feel the case contact the expander rod. There should be little resistance at this point. As the case is advanced into the die, you will start to feel resistance.
As long as the pressure stays nearly constant and smooth, you should be good. If the case starts to start jerking in small steps into the die, STOP. Immediately remove the case from the die. If the case feels a little tight, stop and remove the case from the die.
Make sure there is enough lube on the case and try again. For me, the second time will often times be smooth.
If it is still difficult to move the case forward, stop, remove the case and then insert again. Each time it will go a little further.
At some point, if you are using your sizing die for decapping, the decapping pin will come into contact with the primer or the base of the case, if the case is Berdan primed.
DO NOT FORCE IT! I’m currently waiting on a replacement decapping pin and rod for my universal decapping die. I had checked, the case was Boxer primed, I knew that all it took was a little extra pressure and the primer would pop right out.
That’s not what happened. The pin bent and broke. The flash hole was too small for that decapping pin. I now have a dozen or so cases that I can’t hand deprime. I’m waiting for those replacement rods.
Assuming everything goes right, a spent primer was just ejected from the case. It had to go somewhere. Make sure your primer collection system is in place and functioning correctly.
Having resized your case, remove it from the shell holder and put it in the processed bin.
One day my son took out the trash, he left the tube out of the trash can. When next I started decapping brass, I heard the primer drop, just as I expected it to. I didn’t register that the sound was wrong until a few primers had hit the floor and gone “that-a-way”.
If your case isn’t lubricated correctly, it might get stuck. When this happens, as you attempt to lower the ram, nothing will happen. It will just be stuck there. As you apply more pressure, the case will either come out, or the rim will be ripped off the case.
You are now well and truly fucked. There is almost no tool you can use that will apply enough pressure to pull the case out of that die. If you grip the case hard enough with pliers, you will cause the case to deform, making it more difficult to remove.
Purchase a stuck case removal tool. Or if you are a machinist, make one.
These tools consist of a cap that threads on to the die. A drill guide, drill and tap, and a cap head screw.
Start by backing out the expander/decapping road as much as you can. Then screw the cap over the die. Next, use the provided drill to drill out the primer pocket. You will be able to feel when the bit cuts through the pocket into the body of the case. The drill should be a #3 sized drill.
Put the 1/4-28 tap in place and tap the primer pocket.
Remove the tap and screw the cap head screw into place. Now just tighten the cap head screw until the case comes loose.
Now remove the cap from the die and the case will be completely removed from the die.
Clean everything. Then clean the die a second time. You would rather not leave bits of brass in your die.
Search the web for your kit.
Organizational Tools
Bins, ammo cans and buckets, oh my.
You want to be able to easily pick up your cases to place them in the press. For this, I use a small take out dish. The dish holds around 100 5.56×45 cases. It doesn’t really matter how many. It is just your working supply.
The decapped case comes off the press and into a 5 gallon bucket. I use the big bucket because it is easy to drop cases into it. That is simply a catch bucket. Things move from there.
The raw cases come from 1 gallon plastic freezer bags or ammo cans or big plastic bags. It doesn’t really matter. It is just a source that gets moved to the working container before going onto the press.
Once I’m done with that process, or as much as I can stand, the cases are removed from the bucket and put into a container labeled “deprimed”
When I’m ready for the next step, the cases are moved from the deprimed container, back to the working container. From there, the case is removed, lubricated, and placed in the shell holder. The case is resized. As it is removed from the press, it is dropped into the big 5 gal bucket again.
When I’m done with that process, or when I can stand doing that process anymore, it is put into another container, labeled “sized”.
From here I process the primer pockets. This is done with go/no-go gauges, swage tools, and pocket unifier.
The next step is a sorting step. One input container and two output containers. One container is labeled “Trimmed” and the other is labeled “oversized”. Each case is taken from the input container and passed through the calibers to check for length. If it passes, it goes into the container labeled “trimmed”. If it fails, it goes into the container labeled “Oversized”.
When I don’t have any choice, it is time to trim the brass. This is a two bucket and a working container process. The cases are taking out of the “oversize” container, into the working container. The case is trimmed to length and dropped into the “out” bucket.
When all the cases have been trimmed, we run through them again, deburring the outside. The last step is to deburr the inside.
At the end of that process, the cases are placed in the “trimmed” container.
The cases are now cleaned. I’ll be using the wet tumble method next time. In the past, I used a paper towel and Purple Power to clean each case.
At the end of this time, the cases will end up in a container labeled “Ready to Load”
Here is the thing, if you forget a step, or you are unsure, you need to repeat the step. I know that I reswagged a few dozen cases today. I know this because I had accidentally put some unswagged cases in with the swagged cases. As I was testing at the time, it was no big deal.
Adjusting Your Sizing Die
Your dies will come with instructions. Use them. Your Press will come with instructions. Use them.
Your sizing die will have three adjustments to it. With or without a decapping pin. The depth, the location of the expander ball. The relative location of the die to the shell holder.
The easiest adjustment is to set the location of the die relative to the shell holder.
With the die backed almost all the way out, raise the ram to as close to the die holder as it will come. Now screw in the die until it touches the shell holder in the ram. Because my turret press has slop in it, I screw the die down until all the slop is removed. Some dies have a “touch shell holder and then back off a 1/2 turn” instruction. If they do, use the instructions.
Once your die is in place, screw the locking ring down until it locks in place. Now clamp the ring in place.
If you purchase Lee reloading dies, they come with an O-Ring that is used as a friction lock. Ditch them. Purchase any of the many replacement locking rings.
I’m currently using McJ Tools Reloading Die Lock Rings, 2nd generation. These use a clamp to hold them in place. They are also calibrated in 0.001 of an inch. You can rotate the lock ring by a marked amount to raise or lower the die by a known amount.
Now that the die is positioned correctly, and the lock ring is positioned correctly, remove the die and replace it. Make sure it seats to the correct depth. If not, adjust your lock ring and try again.
If you are using the decapping pin of your sizing die, you want it to extend below the mouth of the die just enough to punch the primers out. Bluntly, I do this by feel, then adjust as required as I go. Once this is done, lock the rod in place. There is often a locking ring to do this.
If you are not decapping as you resize, make sure your expander ball is far enough from the throat of the die that it doesn’t jam the case. That’s it.
Your adjustments are done.
Suggestions
Don’t force it. Lee dies are low-cost and good quality. If you intend to do anything more than range candy, buy dies that have 1/2 inch internal threads. Pick a lubricant, learn it, stick with it. It is better to be using the second-best lube and have it work 100% for you, than to have to remove just one stuck case because you tried something else.
Response To Comments
There were a couple of comments about formatting and errors in Part-4. I responded to them in the thread.
Curby said:
Every time I start reloading, I learn something. Every time I say something here, I get feedback that helps.
Just 5 minutes ago, I learned that the sloppiness of a shell holder can affect the number of stuck cases you get. All shell holders have a certain amount of looseness to them. This makes it easier to insert and remove cases. It also allows the case to float slight to align with the die.
You can buy shell holders that hold tighter tolerances.
As the commentors keep saying, progressive presses are the bees’ knees. They are also more difficult to set up, and you have to understand everything that is happening on the press. Once you get there, wonderful! Until then, keep it simple.
RHT447 says: Use ArmorAll Ultra Shine Wash and Wax to keep your wet tumbled brass from tarnishing. Stainless-Steel pins make brass look like new.
He continues with a suggestion to use a plastic tub with a strong magnet to collect your stainless-steel pins. They do make fancy ones, which I use, that does the same thing. The magnet in the tub trick allows you to attract the pins to the outside, when you pull the magnet away from the inside, the pins will fall off.
His case trimmer is a Forester. (That is one of the best. I have a Lyman).
He likes to swage and then deburr primer pockets.
All good stuff. I’m going to try rinsing my cases in dish soap to see what it does to the Imperial Sizing Wax.
Birdog357, Squib, and I talked a little about pricing. I think I will do a complete post about pricing at some point.
Interesting that bottle-neck cartridges are positioned by the neck and not by the case mouth.
A couple of notes:
There is a fourth way to headspace cases. Belted cases used for magnum rifle rounds have a raised belt near the base that provides positive headspacing and prevents accidentally chambering a round in a non magnum rifle.
Too much lube on the case or a buildup in the sizing die can result in a dented case. I found out the hard way after not loading rifle rounds for a long time.
Small base sizing dies work at the lower tolerance of the cartridge spec which improves feeding in semi-auto actions but may reduce brass life and give lower performance in bolt actions.
Headspacing. Stolen from Wiki—“…headspace is the distance measured from a closed chamber’s breech face to the chamber feature that limits the insertion depth of a cartridge in it”.
“Headspacing is the art of placing the bullet exactly where it needs to be in the chamber, relative to the start of the rifling.” No. This is bullet seating depth.
“When we are trimming a case, we are adjusting the headspacing for the finished case”. As you say, for 45ACP and similar rimless cases, true, unless the case is too short, in which case the rim will headspace against the extractor. Not so for rimmed and bottle neck cases.
Adjusting your sizing die. What he said. Follow the instructions that come with the dies. Should you at some point want to pursue the headspace topic further, there are a myriad of tools out there for many (but not all) common bottle neck calibers. You can measure your brass both fired (chamber) and sized. I have three of these—
https://www.fulton-armory.com/headspacegaugeforcartridge308.aspx
–30-06, 308, and 223. I bought them long ago from Mo Difina. A headspace gauge allows you to adjust the headspace length of your sized brass to a particular chamber, reducing the amount of stretch on firing and prolonging the life of the brass. I shot rifle competition for decades, so brass life was a hot topic for me. I quite understand that this may be a bit far out in the weeds for some folks.
I have had to use a stuck case extractor just once. To borrow a movie line, “I expect that’s a mistake you won’t make again anytime soon”.
On that note, spend the extra for carbide sizing dies (handgun). They eliminate the application and removal of case lube.
Organization. These work great—
https://mtmcase-gard.com/products/universal-loading-tray-all-calibers
Lastly, a snappy hand salute to our host for putting up with my nit-picking. Easy for me to sit here a lob comments after he has done all the heavy lifting.