
B.L.U.F.
An introduction to how to mess up big time when reloading. Remember, don’t trust me. Read the instructions in your reloading guides, your press and die instructions. Follow their instructions.
(2400 words)
The wonderful thing about reloading is the amount of control you can get over the process of creating the “perfect” load for your firearm. The negative thing about reloading is that a mistake can send you to the hospital, or worse, the morgue.
Every “regular” cartridge has a SAAMI specification for it. The SAAMI specification includes the dimensions of the chamber and the pressures for each cartridge. The SAAMI specifications also include how to perform tests.
In general, we do not have the equipment to perform the tests that would give us objective insight into what our loads are doing. Everything we have to work with is measured after the bullet leaves the barrel. This includes velocity, grouping, and other objective measurements of the results of our load.
Unfortunately, there are many aspects of the reloading process that can change velocity or groupings.
What we cannot measure is the pressure inside the chamber. This is the critical measurement.
COPPER CRUSHER SYSTEM
This system employs a copper crusher cylinder that is compressed by a piston fitted to a piston hole into the chamber of the test barrel. The pressure developed by the gases from the burning propellant acts through the piston hole, allowing the gases to force the piston upward, and thereby permanently compressing the copper crusher cylinder. The Sporting Arms and Ammunition Manufacturers’ Institute has adopted the pressure units designation of “Copper Units of Pressure” (abbreviated CUP) for this system. This designation applies only to values obtained using the particular crushers, tarage tables and methods outlined in this Standard.
—Z299.4 (SAAMI Dec. 2015)
Here are a few of the pressure measurements from the SAAMI specifications.
| Cartridge | Max. Avg. Pres. MAP |
|---|---|
| 7.62×39 | 500 |
| 8 mm Mauser | 370 |
| 223 Remington | 520 |
| 30 Carbine | 400 |
| 30-06 | 500 |
| 30-30 Win. | 380 |
When we purchase a “modern” firearm, we are told that the firearm can safely chamber and fire rounds that meet SAAMI specifications. In the US, that is done by manufacturers not wanting to be sued.
When the gun banners scream about “only gun manufactures are protected from being sued”, they are lying. If you purchase a modern firearm and use only reputable ammunition, and that firearm “explodes”, the manufacturer can be sued. And rightly so.
In other countries, they go a bit further.
Proofing
In the olden days, we did not have instruments capable of measuring pressures. We just had “standard” ammunition. People still wanted to know that their gun wasn’t going to blowup in their face when they fired it.
The governments also had a personal investment in making sure the guns they provided to their troops didn’t blow up in the troop’s faces. The solution to this was “Proofing House”.
You could send your pressure holding components to the proofing house, where they would “proof” your firearm. They did this by firing the firearm with a known over pressure round. If the round was supposed to produce 500 CUP, they would fire a few rounds at 1000 CUP.
If the firearm didn’t explode, the proofing house would mark it as having been proved. They did this by stamping a proof mark on the pressure bearing components, the barrel, the breach and maybe the frame or receiver.
This goes on to this day. If you purchase a Glock, it will have proof marks on it. If a component was manufactured in Europe, then it will have a European proof mark. If it was manufactured in the US, then it will have a US proof mark. At the time of this article was published, that proofing house is the Georgia Proofing house. Which might exist, solely to proof Glock firearms, manufactured in the US.
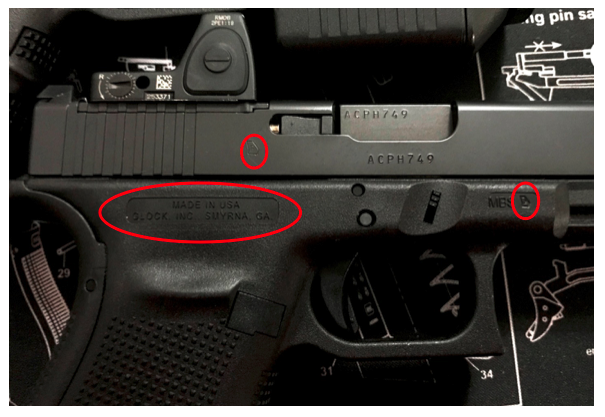
The small red ovals are around the US proof mark. That proof mark is a P inside the outline of the state of Georgia.
Understanding The Warnings
From the SAAMI specifications, we found that the MAP is 520, SAAMI also publishes transducer measured pressure limits, in PSI.
The maximum average pressure for .223 Remington is 55,000psi.
When we look at a sample reloading table, taken from the Hodgdon reloading site, we see that the “Starting Load” produces 39,500PSI and that the “Maximum Load” produces 53,200PSI. This is 1,800psi less than the SAAMI published MAP value.

Going over the maximum average pressure by a little bit is unlikely to cause your firearm to grenade in your face, but it could. DON’T MAKE ROUNDS THAT ARE OVER PRESSURE.
For an example of what happens when a round creates excessive pressure, watch the following AAR:
Scott’s .50BMG rifle exploded in his hands, almost killing him. There is a reason that when I test fire a new load, I always have a safety observer with me.
When you reload, always follow the reloading guides. Check and double-check your charges. Make sure you don’t double charge your cases. Develop habits that keep you from making mistakes.
When Hagar came into the reloading room while I was making some cartridges, she sounded like it was an emergency. I completed the round I was making before I even turned away from the press. Make safety rules for yourself, then follow them.
You will notice that I gave an actual recipe above. It is a screenshot from a site I trust to give me good load data.
Do NOT trust me for load recipes. Do NOT trust recipes you find on this site. We are not a trusted site for load data.
But I only put in …
A recipe includes several different components. They tell you the type of barrel they used. They tell you the case length they used. Generally, that isn’t overly important to you. Then comes the magic, the recipes themselves.
The load data is broken up by cartridge, then bullet, then by powder. I only showed one powder in my example, there are many powders that also work. I showed one bullet type/weight, there are multiple type/weights to choose from.
Hodgdon sells both IMR and Hodgdon powders. The powder I use for many of my military-based cartridges is IMR 4895. There is a different powder, Hodgdon H4895, which is supposed to be comparable in performance.
They are NOT the same! If you have a load that calls for 22.1 grains of IMR 4895 don’t just use 22.1 grains of H4895. They are not the same powder. The starting load for H4895 is 21.0 grains. The maximum load is 22.6 grains.
Using IMR 4895, with a max load of 23.9 grains, at 22.1 I have 1.8 grains of “space” before I reach maximum. Using H4895, I only have 0.5grains.
If I were to use the max load for IMR 4895, just substitution H4895, I would be 1.3 grains over the maximum charge.
Keep your powders straight. Don’t assume that one powder can be substituted for another, 1 for 1.
Bullet weights make a huge difference as well. With a 24.3 grain bullet, the Maximum load of IMR 4895 is 27.0 grains. With a 90 grain bullet, it is only 22.5 grains. Match your bullet weights to the recipe.
Each case holds a maximum volume. Depending on your powder, you might be able to get two loads of a powder into a case.
An example of this is the .45Colt. This is a large case as it was developed for black powder. Titegroup recipes normally take small amounts. It is easy to put 3 or 4 Titegroup charges in a .45Colt case.
When I was starting, I picked some powders because they would overfill the case if I were to double charge them.
Bullet Seating
Part of the process of reloading is seating the bullet. This consists of making sure the distance from the base of the case to the tip of the bullet is a given length.
The more consistent this is, the more consistent your downrange results will be.
In the SAAMI specifications, there is a maximum overall length. This is a “never to exceed” number. If your finished cartridge is longer than this value, you are inviting malfunctions of your firearm.
Silly example of me being stupid. 30-30 Winchester is designed to go into a tube magazine. You do not want sharp, pointed metal things poking into the primer of the cartridge in front. Because of this, you do not use modern bullets with pointy shapes in the cases, to keep from setting off the cartridges in your magazine.
I had bullets that were the right size and the right weight with a polymer tip. Since I couldn’t find the correct bullets, I decided to give them a try.
They loaded ok. Nothing unexpected about that. I went out to my test range, loaded a single round and put it downrange.
Nice results.
I then put a couple of rounds in the magazine and attempted to cycle the rifle. Not so good. The tip of the round didn’t clear the front of the receiver. No easy way to clear the weapon. I ended up taking the magazine cap off and taking the rounds out that way.
This could have gone much worse. I could have shoved the bullet deeper into the case when I chambered the round. This would have reduced the volume inside the case. Reducing the volume can cause the pressure of firing to go up.
Follow the recipes. If it says to seat your 90 grain, Sierra hollow point boat tail round such that the cartridge overall length is 2.380 inches, FOLLOW THE DIRECTIONS.
Response to Comments
gpkoning says that it is interesting that cartridges are positioned by the neck and not the mouth.
Almost, it is positioned by the shoulder, a particular place on the shoulder. This is what makes the process so finicky.
Slow Joe Crow corrects me by pointing out belted magnum rifle rounds headspace off the raised band.
Having read his comment, I did some research. It turns out that he is absolutely correct. That is how belted magnums are supposed to be headspaced. Because the entire process has gotten better as technology has improved, many chambers for belted magnums now headspace off the shoulder.
I have no idea which is better. I have never even seen a belted magnum round.
He warns that too much lube on a case can cause issues on resizing a case.
Again, correct. You are forcing a tube of brass into a tube of steel. Everything is at very close tolerances. There will be metal to metal contact if there is no lube.
The lubricant makes a very thin layer of lubricity that allows the two metals to slide past each other.
If you have too much lube, that lube will be squeezed into the openings which have not closed yet. When you press the case home, all the gaps are gone, the lube now becomes an incompressible lump between the brass walls of your case and the steel walls of your die. Something has to give. What gives is your case, as it develops a dent.
He also says:
I’ve got nothing, I don’t know what “small base sizing” means. I’ll look it up at some point.
RHT447 points out that I got the meaning of headspacing wrong. Rather than try to paraphrase him, here is his comment in whole.
“Headspacing is the art of placing the bullet exactly where it needs to be in the chamber, relative to the start of the rifling.” No. This is bullet seating depth.
“When we are trimming a case, we are adjusting the headspacing for the finished case”. As you say, for 45ACP and similar rimless cases, true, unless the case is too short, in which case the rim will headspace against the extractor. Not so for rimmed and bottle neck cases.
Adjusting your sizing die. What he said. Follow the instructions that come with the dies. Should you at some point want to pursue the headspace topic further, there are a myriad of tools out there for many (but not all) common bottle neck calibers. You can measure your brass both fired (chamber) and sized. I have three of these—
https://www.fulton-armory.com/headspacegaugeforcartridge308.aspx
–30-06, 308, and 223. I bought them long ago from Mo Difina. A headspace gauge allows you to adjust the headspace length of your sized brass to a particular chamber, reducing the amount of stretch on firing and prolonging the life of the brass. I shot rifle competition for decades, so brass life was a hot topic for me. I quite understand that this may be a bit far out in the weeds for some folks.
I have had to use a stuck case extractor just once. To borrow a movie line, “I expect that’s a mistake you won’t make again anytime soon”.
On that note, spend the extra for carbide sizing dies (handgun). They eliminate the application and removal of case lube.
Organization. These work great—
LT150M-30 – Universal Loading Tray All Calibers
Lastly, a snappy hand salute to our host for putting up with my nit-picking. Easy for me to sit here a lob comments after he has done all the heavy lifting.
RHT447, thank you for your feedback. I am reading your comments, learning from them.
You are correct, headspacing isn’t putting the bullet exactly where it needs to be. There is much more to it than just that.
Headspacing and bullet seating depth are big topics. I need to go get a refresher course on headspacing.
As for only getting a case stuck once, good going! My hat is off to you. There is an art to reloading, as well as a science. Part of the art is the ability to feel what is happening in your dies and to understand what you are feeling.
I’ve not attempted to press out a Berdan primer in a couple of years. That I can feel. There are times when I take a case out of the press and examine it to verify it is actually Berdan primed. Occasionally, I’m wrong, but usually, I’m right, and it is a Berdan primed case.
Carbide dies are great for pistol cartridges. I’ve upgraded some of my expander balls to floating carbide balls, for the same reasons.
Pressure. This link will take you to an excellent article, “Correlating PSI and CUP”. It is a free PDF download.
https://www.m14forum.com/attachments/psicuparticle2-pdf.453057/
Lube dents in your brass. Annoying, but no big deal. Shoot them anyway. Irons ‘em right out.
Small Base Dies. These dies size the base of the case a few thousandths smaller than a standard die. As noted, this is intended to provide more reliable function in semi-auto long guns, which it does. YMMV as to whether your particular gun(s) needs one. If ammo sized with a standard die works, no need to fix what ain’t busted. I have a Winchester Stainless Classic M70 in 308. At first I was experiencing sticky extraction with some moderate pressure handloads. A small base size die cured the problem.
An interesting note comes from the USMC. I know all will be shocked to learn that the USMC Rifle Team is fiercely competitive. To that end, there is just about nothing they won’t experiment with, including small base dies to load ammo for their competition M-14’s. They found a small but measurable improvement in accuracy doing so. The theory is that the bit of extra clearance between the case and chamber wall allows the spring powered ejector plunger to position the cartridge more consistently in the chamber shot to shot.
KA-BOOM! Yeah, don’t be that guy. For me, so far, so good. Not to say I haven’t had my moments. There was that time my left leg was pretty sore.
I had just finished loading up 100 rounds of 38 Super. Setting the powder can back on the shelf, my brain finally decided to actually read the label. Rifle powder. Drat. I decided right then that if the pinch of rifle powder in each round was enough to get the bullet down the barrel, I would just shoot them into the ground. Tried one round. Pop. Nope, bullet half way down the barrel. Double Drat. So, for the remaining 99 rounds I had to use one of those hammer style disassembly tools. Turned out my workbench cushioned the hammer blow just enough that it didn’t work. Wound up smacking it on the cement floor. Took a knee 99 times. Next morning, ow.