
(3100 words)
I’ll be addressing comments from Part 1 at the end of this article.
To make a cartridge, you need to place a primer in the case, then add powder to the case, and finally place a bullet in the mouth of the case.
The thing that starts your freedom downrange is the spark button/primer doing its job.
In order for it to do its job, it must be the right type and the right size.
We’ll talk about Boxer primers first.
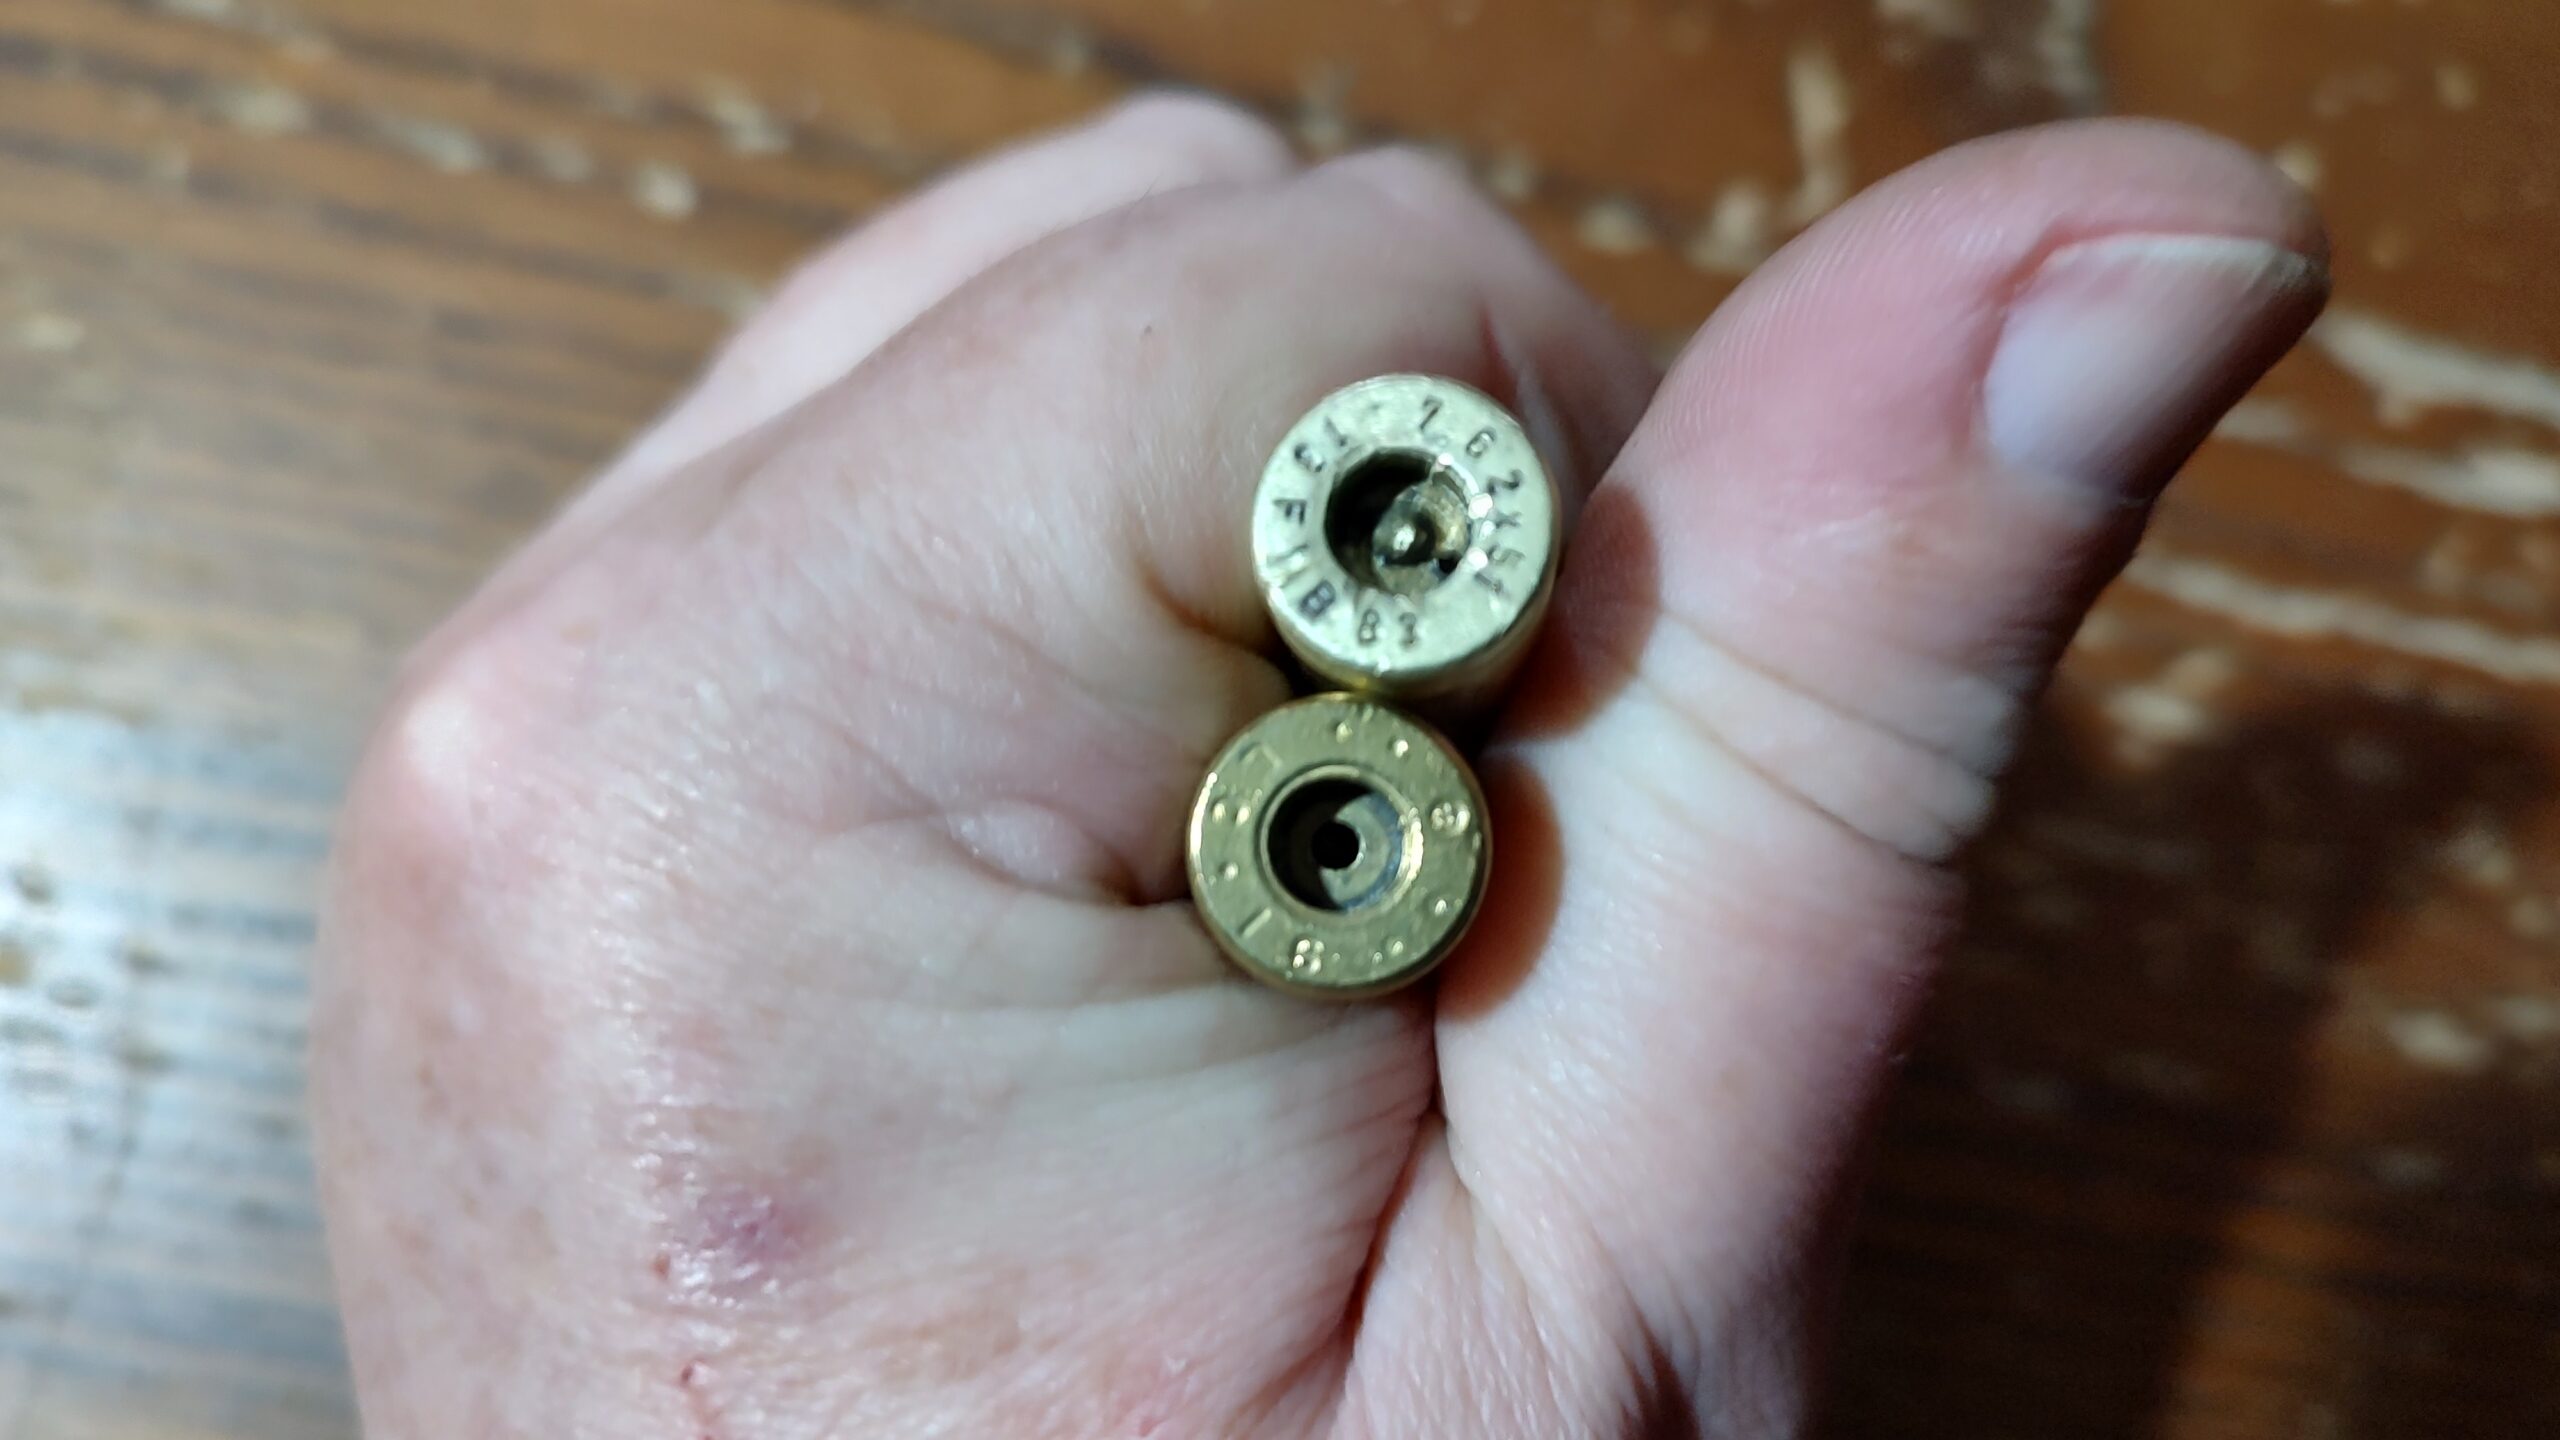
Both of those cases are 7.62×51 NATO rounds. The top case uses a Berdan primer. The lower case uses a Boxer Primer.
Boxer primers come in two diameters, large and small. They come in three sensitivities, pistol, rifle, and military.
So what are the dimensions of these primers?
- Small Rifle
- 0.175 inches in diameter, 0.120 inches tall
- Small Pistol
- 0.175 inches in diameter, 0.120 inches tall
- Large Rifle
- 0.212 inches in diameter, 0.128 inches tall
- Large Pistol
- 0.212 inches in diameter, 0.120 inches tall
This means that you can fit pistol primers in to rifle cases. DON’T DO IT! Don’t put rifle primers in pistols, either. Bad things can happen.
Which brings us to “sensitivity”. When the firing pin strikes the primer intentionally, we want it to go bang. We do not want it to go bang in other circumstances.
The other day I had a failure to fire on a 9 mm round. I dropped the hammer on that round multiple times in the pistol. It did not go bang.
I attempted to shoot it out of a Ruger PC9. It still failed to go bang, but the primer strike (the dimple that the firing pin puts in the primer when it hits) was larger and deeper than all the primer strikes by the pistol.
In simple words, the rifle firing pin hit the primer much harder than the pistols did.
If we use rifle primers in pistol cartridges, the primer strikes might not be strong enough to ignite the primer. This is bad.
So what about using pistol primers in rifle cartridges? Still a terrible idea.
I had a piece of tumbling media stuck in a 5.56×45 case. I had not noticed it when I primed the case. I did not want that piece of stainless steel flying down my barrel at speed. I tried a few things, then I put that case with no powder or bullet in it and just dropped the bolt from my AR15.
The inertia of the firing pin was enough to dimple the primer (and the piece of jammed media came out the barrel). Looking at that dimple scared me.
The AR-15 has a floating firing pins. Some rifles have a spring to keep the firing pin retracted. Think about the spring on a 1911. That spring is there to retract the firing pin and to keep the firing pin from moving forward when the slide slams into battery.
If that primer had been a pistol primer, it might have gone off. That would be a bad thing in that instant. It would be a terrible thing if it had been a live round.
The military primers are a little harder to find. They are even less sensitive than rifle primers but work just as well.
For my 5.56×45 food, I’ve switched to military primers.
The takeaway? Always use the proper primers when you reload
There are different manufacturers of primers. My go-to brand is CCI. Other people swear by Winchester brand primers. I’ve personally used CCI, Winchester, and Federal Primers. All are good.
The brand of primer you use in reloading is up to you.
To throw a wrench into all of this, there are another couple of terms used with primers.
The first is Magnum. These are primers that make more spark. For example, the .38 Special and the .357 can use the same bullets. A .38 special will work (nominally) work in a .357 magnum firearm. The reloading tables call for a regular small pistol primer for the .38 special yet want a magnum primer for the .357 magnum.
The other term is “Benchmark” or “Match Grade”. These are primers that are more consistent than regular primers. If you are reading this article for information about reloading, you are not yet ready to look at benchmark/match grade primers. Stick with the regular primers and save yourself some dollars.
Circling back to the image, compare the two primer pockets. The bottom case has a primer pocket for a boxer style primer. If you are reloading, you will be buying boxer primers. When the spark is initiated, it moves through the “large” hole in the center and ignites the powder.
That initiation takes place when the primer material is crushed between the anvil and the base of the primer when the firing pin crushes the base into the anvil. Since there is no anvil in the boxer primer pocket, that anvil must come in the primer.
A nice feature of that large hole is that you can stick a punch through the hole and push the spent primer out of the primer pocket. This is what makes reloading fired cartridges possible.
The top case is Berdan primed. In the pocket you will see an anvil. To the side, you can see one hole clearly and there is another in the shadow. The two holes mean the spark has two paths to follow to get to the powder. Having the anvil built into the case makes the primer less susceptible to failure.
Today’s boxer primers are just as reliable as Berdan primers, 100+ years ago, that was not the case.
The “proper” way to remove the primer from a Berdan case is to use hydraulic pressure. You place the case in a solid holder with a hole for the primer to fall into. You fill the case with water. You put a close-fitting rod in the mouth of the case and hit it hard with a hammer. “The primer just pops out”.
That’s not how it worked for me. I don’t think the surface I was placing my block on was sturdy enough. I don’t think I was hitting the rod hard enough. After multiple attempts, the primer did not budge.
To remove that primer, I drilled through and then used my smallest Starrett center punch to pry the primer out. It took a fair bit of time. Nothing I want to do in mass. All that work, just for the photo-op.
Case Preparation
Before you can prime a case, you have to make the primer pocket ready. The first step is to remove the old primer.
We use a “decapping die” or a “sizing and decapping die”. As your first die purchase, buy a purpose built decapping die. This is a die which has a decapping rod, but the case never touches the walls of the die.
This means that the only thing that is happening is the primer is being pushed out. For a beginner, I recommend the Lee decapping dies. They are low cost, but more importantly, the decapping rod will push out of the collet if something is wrong.
One of the things you will need to develop, is a feel for your press. You should have an idea of just how much pressure it takes to pop out a primer. If it feels like it is taking too much pressure, STOP. Make sure everything is good to go.
Is there a small rock in the case? Are there some steel pins from wet tumbling the case? Is there another case inside this case? Or is it a Borden primed case?
Stop, use a flashlight, don’t mess around with your phone, get and use a real flashlight. If you look into the mouth of a case, you will be able to see the bottom of the case. If you can’t see the primer hole, put that case aside.
Never force it.
If you are depriming ammunition that could have been used by the Military, that ammunition will have been prepared differently than ammunition destined for the commercial market. To make the ammunition more impervious to the environment, the cases will often be sealed with a lacquer around the bullet/case joint and around the primer. In addition, the primers will regularly be “staked”. This is the process of upsetting a small amount of metal from the case into the primer pocket, locking the primer in place.
Your press has more than enough leverage to pop even staked primers out of their cases. Unfortunately, this will sometimes leave the primer pocket incapable of accepting a new primer.
There are two ways of fixing this, you can either remove metal or you can push the metal out of the way.
Removing metal is easy. You get a tool to do it. Lyman makes a “Case Prep Multi Tool”. It is a hollow aluminum handle that holds different bits/tools. Each end has a hole for the tool to thread into.
There are large and small primer pocket cleaners and large and small primer pocket reamers.
The reamer will remove metal to make the primer pocket the correct size. Part of this process will remove the stakes that were put into the case to hold the primer in.
This is my go-to method. Mostly because I made an adapter, so I can drive the different tools from my portable drill.
They make powered machines that run all the tools at once, that makes it easy to process your brass.
The second method is to use a swagger tool. RCBS and Dillon make standalone versions. I have the version that fits into my press.
Why don’t I use it more often? It doesn’t work perfectly on my standard press. I’ll fix that tomorrow.
The tool has a large and a small swagger that fits in place of your shell holder (we’ll cover this in detail in the section on dies). A die body screws into the press. That die body holds a support rod. When you bring the ram up, the rod in the die body stops the case from going up anymore. The swagger is then forced into the primer pocket, resizing it to perfection.
When you lower the ram, a cup that fits over the swagger pops the case off the swagger. That cup system doesn’t work on my press. I have to make an adapter for it.
Having just run a test over a dozen 5.56×45 cases, I should have been using the swagger tool from the beginning.
Regardless, you will need to have something to properly size and shape those primer pockets.
Insert the Primer
It is a little known fact that many common high explosives are pretty insensitive to impact and heat. You can shoot C4 and it won’t go boom. You can stomp on it. No boom. You can even light it on fire. No boom.
Stomp on that burning C4? BOOM!
Smokeless powder is fairly insensitive. If you apply flame to it, it will burn. It might even flash. Most will not flash as fast and hard as black powder. When it is not contained!
I won’t do it, but I strongly believe that you can hit most smokeless powder with a hammer, and it will not go off.
Primers are sensitive. They must be to initiate that spark of life that will send a freedom seed downrange.
I treat primers with a great deal of respect. They can go pop if you do things wrong.
Most priming tools are designed so that if one primer goes pop, the rest of the primers in the tool do not go off in a chain reaction.
We start with a simple on press priming tool. Lee makes an option called the “Ram Prime”. This consists of a holder that screws into the top of your die holder. You put a shell holder in the holder and your case into the shell holder.
A priming rod holds a spring-loaded cup. You place a primer into the cup, raise the ram and the primer is pressed into the case.

The upside? It works, it is low cost, it gives you all the leverage you need to prime a case.
The downside? You have to handle each primer individually. This is painful. They are small items. It is easy to drop them. And I just don’t like the idea of handling them for reasons of contamination of me.
There are other on-press priming systems that are feed from trays or tubes, which allows you to prime your cases on the press without ever touching a primer.
There are also off press priming systems that can provide the leverage to install primers, and there are handheld versions.
Failure to Fire
It is critical to make sure that you seat each primer completely. As I said earlier, boxer primers have an anvil in the cup. As shipped, that anvil is not in the correct location for the primer to ignite.
For the primer to ignite, the anvil has to be pressed back into the cup just enough. If you do not seat the primer correctly, this does not happen. If it doesn’t happen, the primer won’t ignite and there is no spark.
If the primer is not seated correctly, there is a small possibility that the spark won’t be enough to ignite the powder. That will give you a squib.
A squib has just enough go juice to get the bullet/freedom seed out of the case and into the barrel. It might not have enough juice to make it out of the barrel. If you fire a second round, you might be firing into a plugged barrel. Don’t do this.
I managed to incorrectly seat about 40% of a run of 50 cartridges. 2 out of 5 cartridges refused to go “bang” when I pulled the trigger. It is not safe to attempt to reseat primers. This could cause the primer to go off. If the primer goes off when there is powder and a bullet, you will have something a bit more than a simple “pop”.
Answering Comments
Curby says: Go SLOW. Pay attention to what you are doing.
Absolutely! No distractions. If your spouse suddenly screams, and you have to run to the rescue. Make sure you resume safely, do not skip steps. Don’t make mistakes.
Birdog357 asks: Has reloading come back below retail price on the common calibers yet?
1000 rounds of 5.56×45 is about $100-$150 more retail over reloading. The price difference gets better if you can recover all of your brass.
“Lee N. Field”, Curby, and Skinnedknuckles all suggest Turret presses as a first press.
Yes and no. A turret press can be a good starting point. It is what I use today. But I seldom use it in automatic advance mode. Instead, I use it as a quick change single stage press.
When you use a single stage press, you have exactly on die in the press. You can do that one operation, and then you have to change the die for the next operation.
To load a cartridge, you need to decap/deprime, size, prime, flare the mouth (straight walled cartridges), charge, seat the bullet, optionally crimp the bullet in place.
With a single stage press, you set up your first die, run all your cases through the press for that operation. You then change the die and do the next operation. This can mean putting a case into your press multiple times. For me, doing all operations on the press that’s: 1) decap, 2) size, 3) prime, 4) seat bullet and crimp.
There are steps I’ve left out. That list is of the number of items done on the press. So my cases go onto the press 4 times.
With a turret press, you put the case into the shell holder, decap and size with an upwards press of the ram, prime on the down stroke. The turret rotates to the next station and you flare and charge the case. The turret rotates to the next station. You now seat the bullet. The turret rotates to the last station, and you crimp the case around the bullet.
Turret presses are a good second press.
Chris says: Nobody saves money reloading. You will spend the same amount, just send more freedom seeds downrange.
I agree with him totally.
gpkoning talks about accuracy and resolution of tools.
Accuracy is how close a measurement is to the true value being measured. If my tape measure tells me that a piece of wood is 47.5 inches long, and it is 47.4 inches long, the accuracy of my tape measure is off from the true value by 0.1 inches.
If you are a woodworker, this might be good enough. If you are a metalworker, it is unlikely to be good enough.
Resolution is the smallest change that can be measured.
My standard tape measure goes down to 1/16 of an inch, or around 0.061 inches. My calibers read to 0.001 inches. My good tape measure reads to 1/32 of an inch. My micrometers read to 0.0001 inches.
My standard tape measure has an accuracy of around 1/32 of an inch. My good tape measure has an accuracy of around 1/32 of an inch without magnification, 1/64th if I use magnification. My calibers have an accuracy of around 0.005 inches. They will measure differently depending on the amount of pressure you use. My micrometers are accurate to 0.0001 if they have been recently calibrated.
How accurate do your tools need to be? Fairly accurate. Any set of calibers that is accurate to 0.002 will work fine. The scale you use needs to have a resolution of 0.1 grains and an accuracy of 0.1 grains.
RHT447 says that when he sold reloading equipment, he would tell his customers that it would cost around $500 including components for 100 rifle rounds of a single caliber.
I don’t disagree.
He also suggests taking breaks often to keep from zoning out.
MartyB says he is looking forward to more of the series.
Slow Joe Crow says that he got into reloading in 2020. He uses RCBS for almost all of his equipment. He talks about using volumetric powder measuring. He reminded me of my swaging tools.
Volumetric measurements will be covered in the article on charging cases. He also lists some of his equipment, which I have not mentioned yet.
Everybody seems to say something about “pay attention when you are reloading” but that we listen to music while reloading.
The other thing is that progressive presses are not a good starting point.
My turret press is NOT auto advance. You have to turn the die head with your hand.Its has the small 3 die round heads. My powder charge is separate frome the press. I do 50 cases at a time- resize, de prime, prime, check check check. I put the primed cases in a holder upside down so I can see the primers. Then bell case mouth and powder charge. Then bullets and seat/crimp die. Personally I quit trying to load .223, too tedious and I’ve stuck 3 cases.. never stuck .308,.45,38/357.. one thing I found with my Dillion XL750-. Pistol cases I deprime and resize on my turret press, the progressive press sometimes doesn’t do that well. It would also skip a new primer, but I cured that. Case prep is the only time I listen to music… THINK y’all..
Thank you.
.
A clarification question, please … What’s the difference between a turret press and a progressive press?
Good stuff, sir.
A bit of primer history. Col. Berdan was American, Col. Boxer was a Brit.
https://gunmagwarehouse.com/blog/berdan-vs-boxer-primer-a-history-of-the-modern-primer/
I don’t use a progressive press for any cartridge that needs lube to be re-sized. My main buggabo is the removal of said lube from loaded rounds. The other is being able to clean the primer pockets. I divide my reloading into case prep, then loading ammo. These days I use a de-capping die to punch out the primers, then wet tumble with SS pins.
Berdan primers. I’ve seen some Yootoob videos on how to convert Berdan primer pockets over to Boxer with the aid of a drill press. Yeah, still not worth it.
Saving money. Nope. However, your cost/round is much less.
Music. “Task” music, like the example in my earlier comment. No Rock ‘n Roll, no lyrics.
One note on primer brands, some progressive reloading press makers say to only use CCI primers since they are less sensitive and thus less likely to go off in a priming tube. On the other hand Federal primers are supposed to be slightly more sensitive thanaverage. This explains some of the high demand for CCI primers.
In a decade of reloading I’ve only had one primer go off from being seated backwards. I’ve had many go in sideways or upside down without ill effect. This surprised me quite a bit. Mixed brands too; CCI, Winchester, Federal, etc. Whatever I can get my hands on is usually what I use.
100% disagree and buck conventional wisdom on the press. Get a turret for your first press. You can reload single stage with it to learn and it will set you up for decent production in the future before taking the big jump to a progressive press. You will be disappointed you wasted your money on a single stage when spending the same money again for a turret press unless you need the single stance for larger cartridges. Scour tag sales, estate sales, etc too, I’ve gotten lots of used reloading equipment cheappppp that way.
.
Much like motorcycles, you need to know your limits and be able to restrain yourself with reloading. If you try to go too fast or skip steps you are going to hurt yourself. If you are impatient you probably shouldn’t be reloading anyways, just like if you are a bone head you probably shouldn’t be riding.
.
Also I just go to cabelas etc and take a pic of the load I want out of the communal manual if I want ONE thing from it; I’m not buying a whole manual for one load.