
(Word 4400>
Choose what you are going to reload
I will be reloading 5.56×45, 9×19, and .45 ACP.
Acquire The Tools You Need
Get your reloading Bible(s)!!!!
Because this is my first time reloading, I chose the Lee Precision Anniversary Challenger Kit. This gets me a single stage press, powder scale, some brass prep tools, on press priming, powder throw, funnel and more.
To this, I add a pair of dial calibers, no name will do ok. A Deluxe Quick Trim Case Trimmer. The quick trim die for 5.56×45. And a Lee universal decapping die.
Finally, I pick up a wet tumbler, media, a set of sieves, and a trickler.
Because I read AWA’s articles, I purchase Redding dies for 5.56×45, 9mm, and .45ACP.
Picking Boom Stuff
Power is difficult to get at times, looking at the recipes and costs, I decide on Titegroup for my pistol calibers and Ramshot TAC for the 5.56×45.
The Titegroup seems to be an ok powder. There are many recipes for pistol calibers that use it.
NOTE: Powder choices are very personal. Please do your own research. This is not a recommendation for either of these powders.
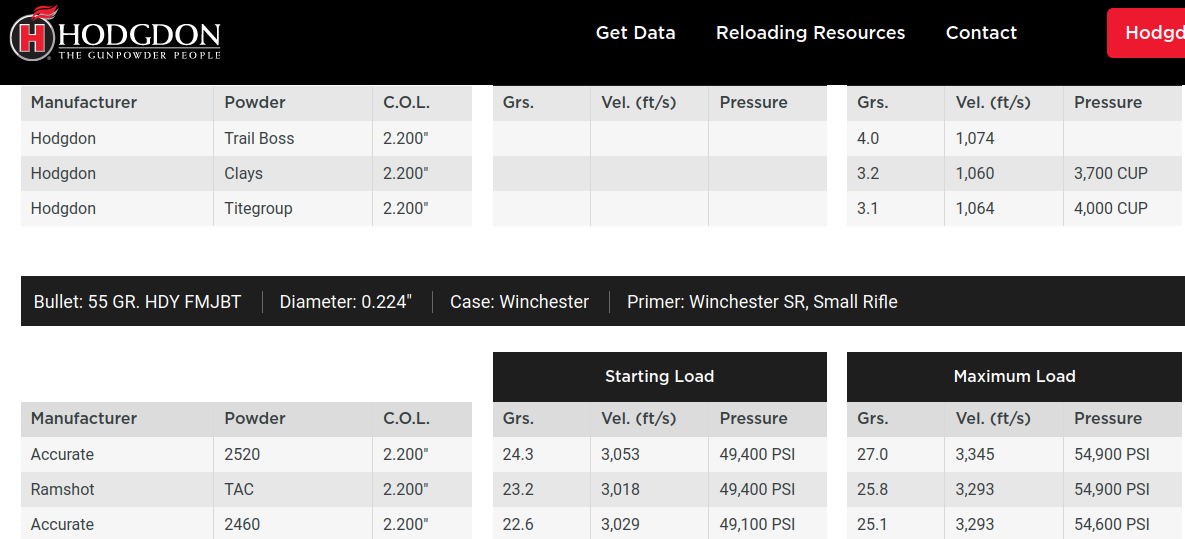
The recipe that I’m using comes from Hodgdon’s.
Checking a couple of sources, MidWay USA, Graf and Sons, and Powder Valley, I find one that has powder and primers in place. Because of HAZMAT charges, I purchase from just one source. I end up with CCI #400 small rifle primers, CCI #41 5.56mm NATO-SPEC primers, CCI #500 small pistol primers, and CCI #300 large pistol primers, one pound of Ramshot TAC, and one pound of Titegroup.
This purchase was more than all the equipment. Ouch.
Record the recipe that you are going to use in your logbook. You want to record:
- Date Recipe was created
- Bullet, manufacture and type
- Bullet Weight
- Powder
- Charge Weight
- Case Length
- Cartridge Overall Length
For each reloading session, record:
- Date of Session
- Number of cartridges created
- Note anything out of the ordinary
- Note any changes made to the recipe as written
For each test session, record:
- Date of the Test
- Temperature and humidity
- Location, with the ability to get the altitude
- Session the cartridges were reloaded
- Group sizes at what distance
- Velocities and statistics on the velocities
Non Boom things
I’ve been picking up range brass and have a few hundred 5.56 cases. If I didn’t, I would buy 1000+ from Diamond K Brass.
For bullets, I pick up 1000 55gr FMJBT from Rocky Mountain Reloading. I would also get my 9mm and .45ACP bullets from RMR.
Setting Up
While waiting for the components to arrive, it is time to set up the press.
You will need a sturdy bench to do reloading, you will be applying significant downward pressure on the press lever and then lifting, hard, to extract the case from the die. Because of this, your press needs to be that sturdy.
I built a custom bench from 2x6s that is 3ft by 3ft. This is too small. Doing it over again today, I would have made it 3ft by 4ft. That extra foot of length would make everything so much easier to do. Plan on drilling holes in this table. You are going to want to mount things to this table.
Mount the press to one side, based on your dominant hand.
You will need to mount the arm for the powder throw. You will be using two hands to dispense powder into the pan. The pan then gets transferred to the scale. You will then need the trickler positioned to drizzle powder into the pan, while it is on the scale. You will then be transferring the powder to the case. One hand for the pan, one hand to stabilize the powder funnel and case.
The filled case is then transferred to the press.
Sit at your bench and do those actions. Remember, you have to have a place to take cases and bullets from as well.
Move through the motions and see what happens. Then mount your powder stand/arm.
Decap
We start by decapping all the brass that we have. If your brass has dirt in it or attached, just rinse it off with water and let the cases dry before decapping.
This is dirt, not being dirty. We’ll deal with dirty next.
With your decapping die in one hand and one of your cases in the other, slide the case into the die and feel around until you feel and hear the decapping pin move into the flash hole of the case.
Do this a few times until you can visualize what is happening inside the case, between the decapping pin and the flash hole.
Now put the die into the press and adjust as instructed. Adjust the amount the decapping pin sticks out according to the manual.
Make sure the ram is lowered. Take the case you had before and, manually, slide it up into the die and feel around until you feel the decapping pin go into the flash hole. Visualize what is happening.
Put the #4 shell holder in the ram. It slides in and will click into place. There is a wire spring that holds it in place.
Notice how that shell holder wiggles and moves, just a little. Slide the case into the shell holder.
The case is now held in place. Again, wiggle the case and see how loose it is and how much it can move around.
This ability to move is called “floating”.
Slowly raise the ram. When you get about 2/3s of the way up, the mouth of the case should enter the decapping die. It might miss by a little, just use your fingers to wiggle the case around until it moves into the die.
Continue raising the ram, move the base of the case off center a little. When you get near the top, you should feel the decapping pin hit the base of the case, NOT the flash hole.
Feel this! Feel where the lever is. Feel how solid everything feels.
Now lower the ram a little, position the case correctly, and raise the ram again.
Feel the decapping pin enter the flash hole. As you continue to raise the arm, you will feel it “stop”.
Compare this to the feeling when the decapping pin was off center. Feel where the lever is.
This is how you tell when you will be able to press out the primer.
Continue to raise the ram, and you should feel the “pop” as the primer is pushed out of the primer pocket.
This is the first place where things get interesting. The amount of force it takes to remove a primer varies. If this is good brass that has normalized primer pockets, the primer will come out easily. If the primer pocket has “military stakes” it will be harder to remove. If the flash hole is too small, it might be impossible to remove the primer. If it is Berdan primed, it can be considered impossible to remove.
If you have any doubt, STOP. Take the case out, use a flashlight/torch and look inside the case. Make sure you can see the flash hole, and just one of them.
Use the manual method to see if you can find the flash hole with the decapping pin. If you can, then you are good to try again.
You will break decapping pins. It is a truth about reloading. That is why all decapping dies have replaceable decapping pins. Redding Die sets come with an extra decapping die.
You have successfully removed the primer from a case.
Go ahead, remove as many primers as you want.
First Cleaning
If you are using a vibrating tumbler to clean your brass, put your media in the tumbler (walnut husks), some polishing agent, cover, and run for a time. Figure on an hour the first time.
Using a wet tumbler. Add your stainless-steel pins to the tumbler, then add brass. Do not use too much media and do not put too many cases in at once.
You want to then add water until the cases are covered. The combined amount should not exceed half the capacity of the tumbler.
Next, add some Dawn dish soap. Ok, I’m just repeating what I’ve been told. I use Dawn, it is what is recommended over and over again. It works. Don’t mess with a working recipe.
You need enough, but too much doesn’t seem to be an issue.
Run for 30 minutes.
Drain the water from the tumbler and rinse your cases. They should be looking pretty good. At this point, you can do a second run with more Dawn or with LemiShine. If you do another Dawn run, you will need to do one more after.
The last run will either be plain water or a LemiShine run. This is to get any of the soap off the cases.
Now dry your cases. A food dehydrator on low does a fantastic job.
Collect all the stainless-steel media that you dropped. Dry that before storing.
Sizing
Now that you have all that nice clean brass, it is time to size it.
Clean your sizing die. It should have some sort of oil on it, to keep it from rusting. All that oil must be removed. My go to is Purple power. I have another degreaser in the shop that I also use. It just has to do a good job.
Make sure you get all the degreaser removed from your die. No water, no oils, no degreaser should be left.
You should follow directions on how to oil the die. I do not oil my die except to store it.
Remove the decapping die and insert the Full Length resizing die in the press.
Raise the ram to the top of travel, lower the die until it just touches the top of the ram. Lock the die at that point.
You might have to adjust the decapping pin. You can remove the decapping pin if you wish. If the decapping pin is removed, make sure the die still has a neck resizing ball. The Redding Dies do this, I don’t remember if Lee dies do.
Following the instructions for your sizing lubricant, apply liberation to a case.
Put the case into the shell holder (#4 for us), and raise the ram. You should feel the case start into the die.
Continue to raise the ram. You will feel the case start to contact the neck resizing ball. You should feel the resizing ball enter the neck of the case.
Feel free to repeat this movement a couple of times to get the feel of that first contact and the neck resizing.
Now continue to raise the ram. The resizing ball will enter the body of the case. The sides of the case will now contact the sides of the resizing die. If all is good, you will be able to raise the ram to the top of travel with a smooth motion.
If the insertion of the case feels like it is sticking and then jumping a little deeper, STOP. Pull the case out. Apply more lubricant. Try again.
It is ok to insert the case partway, pull it out, then insert it again. I’ve found that this makes it less likely that I will get a case stuck.
Once the case is fully seated, lower the ram. Do NOT let that case sit there for any length of time. You want the case out of the die as soon as possible.
As you pull out the case out, you will feel the sides release, then the expander ball will engage. It will take a bit of effort to pull the case out over the expander ball.
Your case has been resized!
Resize the rest of the cases you cleaned.
Inspect!
Take your calibers and set them to 1.760 inches.
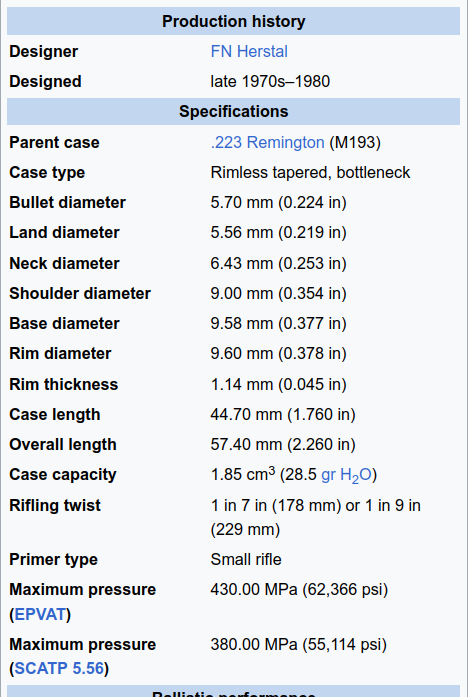
I got the length from my reloading bibles. There are multiple locations where you can find this information.
Lock the calibers at 1.760 inches.
For each case you resized, do a visual and tactile inspection. You are looking for holes, cracks, and BIG dents. Most of the little dents don’t matter to us.
If it has a crack or hole, it needs to be discarded. If the dent is too big, it should be discarded.
For me, if a case has a crack or hole in it, I will use a pair of pliers to crush the mouth of the case closed. Safety.
Next, the case is gently moved through the jaws of the calibers. If it passes through easily, put it in the accept bin. If it doesn’t go through, put it in the “to be trimmed” bin. If it barely goes through, it is a personal choice. If it feels “tight” I’ll put it in the trim bin. Otherwise, it goes in the accept bin.
Trim To Length
All the brass that was put into the “trim” bin now needs to be trimmed. Using the quick trim system from Lee, you put the quick trim die on the press, adjust as required, then you are ready to trim.
Using the quick trim system, the length of cut for the case is fixed. This is fine. If you follow the instructions, you will end up with cases that are 1.750 inches long.
Measure the first case you trim to make sure it is close to 1.750. I use an Eze Trim system, which is also a fixed length. It gave me 1.750 each time I used it.
If you get a universal trim tool, you will put an over-length case in the tool. Adjust so you trim just 0.001 or so off the case. Measure the length of the partially trimmed case. Adjust so that the length is exactly 1.750.
No matter what trimming method you use, you will end up with brass that is 1.750 long which has nasty burrs on the inside and outside of the case.
Using your chamfering tool, remove the burr from the outside of the case. Then use the inside chamfering tool to remove the burr from inside the case.
Primer Pocket, optional but recommended
Take all the brass that you have processed so far, both the trimmed and accepted bins, and process their primer pockets.
The standard operations you can do to a primer pocket are: Remove the military crimp, normalize the size, clean the pocket, swage the pocket.
If you are going to swage the primer pocket, you don’t need to remove the crimps nor normalize the size.
If you are using the wet tumble method, you don’t need to clean the primer pockets.
Select the small chamfer/reamer tool. For each case, make sure the tool will twist easily in the primer pocket.
This process will leave little brass shavings everywhere. When you are done, you should be able to easily primer your cases.
If you are swaging, you swage instead of chamfering. I prefer to swage, but it takes a bit longer.
Final cleaning
If you are using the vibration method, pour your cases in to the media with the polishing agent. Let it run for a few hours.
If you are using the wet tumbler method. Start with a 30-minute run of dilute Purple Power and water. No media required.
After 30 minutes, drain the water. The second run is 30 minutes with Dawn dish soap with your stainless-steel media.
The last run is 30 minutes with water or water and LemiShine.
Make sure you rinse everything after the final round.
Dehydrate for 30 minutes.
Inspect
It is time for your final inspection. Use a flashlight and look inside each case as you take it out of the dehydrator or off the drying rack.
You are looking for any pins that have stuck in the case. If you find some, use a 1/16 inch punch pin to press out the stuck media through the flash hole.
You do not want to be shooting stainless-steel pins down the barrel of your firearm.
Prime your brass
Set up your priming system with small rifle primers. You can use #41 small rifle primers if you are priming 5.56 cases.
Look at your tool, notice where it will hold the primer. Now look at your case. The case is either going to be pulled down over the primer, or the primer will be pushed into the case.
Your primer will be sitting in some type of cup. You should be able to see the inside of the primer when you look down into the cup, not the shiny side.
Now that you have verified that the primer is the right way, put one case in the priming tool or press and seat the primer FIRMLY.
Take the primed case from the tool, inspect the primer pocket. You should now see the shiny, smooth side. If you see the anvil, you put the primer in backwards. Use your decapping die to remove the primer.
Do it right the second time. Check again.
Now run your finger across the base of the case. The primer should not stick out. It should be level with the base of the case.
The rule of thumb is to never reseat a primer. Doing so could cause the primer could go off.
Stop when you have 10 cases primed.
Set Up the Seating Die
Put your seating die in the press.
I will be describing how to set up Redding dies with seat/crimp combination die.
Back the seating steam out of the die until it is almost removed. Better to have it to far out than not enough.
Put a trimmed case in the press and slowly raise the ram. It should go into the die, but you should not feel the case contact anything. If you feel the case contact anything, stop and back the die out some more.
The seating stem screws into the top of the die. The die screws into the press.
With the ram fully raised, lower the die until you feel it contact the case, now back the die out one full turn, and lock it in place.
Throw your first charge
From the Hodgdon website, I find the recipe I’m going to use. “55gr FMJBT over 23.2gr of Ramshot TAC”. DO NOT USE MY RECIPE. Look up your recipes in trusted sources. Even the image above should not be trusted. It might be out of date.
Clean up your loading bench. Get your scale, trickler and powder charger out and setup.
Add powder to the powder charger, about 1/3 to 1/2 way full. Add Powder to the trickler until the powder covers the tube inside by 1/2 an inch or so.
Zero your scale, with the pan on the scale.
Now dispense a charge into your powder pan, pour it back into the charger. Do this five times.
Now throw another charge, weigh it.
We want it to weigh between 22.8 and 23.1 grains.
If it is too heavy, pour the powder back into the charger, adjust the amount of powder being thrown.
Now do your ritual 5 charges and weigh the sixth one.
Continue to adjust, throw, measure until you can get five charges in a row that are within tolerance.
Now that you have a charge within tolerance, move the trickler so you can trickle powder into the pan as it sits on the scale.
Trickle powder into the pan until you have exactly 23.2gr of powder in the pan.
Put the powder funnel over the mouth of your first case, pour the powder from the pan into the funnel and into the case.
Tap the side of the funnel gently to make sure all the powder flows into the case.
Use your flashlight to look into the case. See the top of the powder.
Congratulations, you have powder in your case.
Seat Your Bullet
Without taking your hand off the case you just charged, transfer the case to the press.
Place a bullet, base first, into the mouth of the case.
Raise the ram, you might have to use your fingers to guide the bullet and case into the die. When the ram is fully extended, you should not have felt anything touching the case or bullet.
Now slowly screw the seating stem back into the die until you feel it contact the bullet.
Lower the ram just a bit, you need to lower it more than 0.075 inches. I.e., not much.
Now screw the seating die in one full turn. On the Redding die, that will be 0.050, on a Lee die it will be 0.056.
Raise the ram again, you should feel it contact the seating stem as it presses the bullet into the case mouth slightly.
Now lower the ram and screw in the seating stem another full turn. Raise the ram to seat the bullet a bit more.
Lower the ram, take the cartridge off the press, measure the cartridge overall length (C.O.L.).
Subtract 2.200 from that measurement. That difference is how much further the bullet needs to be seated.
If the C.O.L. you measured was 2.835 then the difference would be 0.635 inches.
Return the cartridge to the press. You know that each turn of the seating stem is about 0.055 inches. So screw it in as needed to get until the difference between 2.200 and your measurement is less than 0.010 inches.
Go slowly, if you over shoot, you will have to pull the bullet to reuse the case.
Once you are close, use smaller rotations of the seating stem. With a little patience, you can get the die adjusted so that the C.O.L. is exactly 2.200.
Take that cartridge and put it aside.
Adjust for Crimping
Since we are making plinking/combat ammo and not precision target ammo, we’ll crimp our cases.
For dies which seat and crimp, the following is my method of doing it.
The cartridge we just made is our “master”. It has the perfect C.O.L.
We unlock the die from the press and move the locking ring up a few full turns. We back the seating die out at least four turns.
Put the master cartridge back in the praise, raise the ram slowly. You should not feel it hit anything.
Screw the die into the die holder until you feel it touch the mouth of the case.
Lower the ram, screw the die in 1/4 to 1/2 of a turn and lock it in place.
Raise the ram and you should feel the case crimp. Remove the case and examine the crimp. Too much? Back the die out a little. Too little, turn the die in a little.
Follow the instructions that come with the die. Too much crimp is harmful for the cartridge, too little and the bullet my move in the case mouth.
With the ram fully raised, slowly screw the seating stem in until you feel it touch the bullet. Lock the seating stem in place.
Lower the ram and put the completed cartridge to the side, in a tray or bin.
Second Cartridge
Repeat the process of charging a case. Place that case in the press.
Put a bullet in the mouth of the case, carefully raise the ram in a smooth motion until the ram reaches full extension.
Lower the ram and you should see a completed cartridge. Remove and measure the C.O.L. If the C.O.L. does not match our target, barely adjust the seating die.
This can happen because there is a difference between sneaking up on the C.O.L. and going straight there.
Adjust as you see fit.
The Next Three Cartridges
Repeat the next three cartridges just as you did the second. You can measure if you wish or not.
At this point, you have completed five cartridges.
Go Test
I know you are having fun. You want to finish loading all the cases you have prepared. DON’T!
Instead, take those five cases to the range and fire them.
You want to make sure that they function the firearm. You want to make sure they group nicely. If you have a chronograph, you want to make sure they have consistent velocity and that velocity is where you want it.
Make sure you record your test session data.
Adjust
If you are unhappy with your results, change one thing, load 5 cartridges, test again.
Things that can be adjusted:
- Powder Charge
- C.O.L.
- Powder used
- Primer Used
Usually, the cartridge will perform well enough. You are unlikely to adjust anything apart from the charge weight
Produce
When you are happy with your recipe results, it is time to produce.
Just sit there and do it. Take breaks when you must.
NEVER interrupt a cycle. Once you throw that initial charge into the pan, do not stop until the cartridge is completed OR you have reset the cycle.
By resetting the cycle, I mean returning the powder that his been dispensed back to the charger or trickler. There are no cases with powder in them, but no bullets.
Verify.
Clean Up
Powders do not like water or O2. They are full of nasty stuff.
When you finish a reloading session, you need to do a full cleanup.
Empty the trickler and charger back into the original powder can.
Some people keep a can just for partials like this. I disagree. I want the powder in the can it came from.
Powders will eat at plastics and coatings. It is imperative that you get every grain of powder out of the trickler and the powder charge.
Follow the instructions on how to clean them.
Have Fun!
You have just produced your first reloaded ammunition. If you collect your brass, you will be able to reuse it many times.
There are many things that can be added to your tool set to enhance it for you.
For me, the biggest is an auto-powder charger. I enter the charge weight, press the go button, the machine dispenses that much powder into the pan.
Before that, it was just a simple digital scale. If you do get a digital scale, make sure it is a scale that can be plugged in. It isn’t fun when your scale goes into power save mode if you take too long to get back to the scale.
biggest issue I found with reloading is depending on powder choice, the powder throw can and WILL BE inconsistent with extruded powders( look like pencil lead). you end up doing powder by hand/ scale for each round. Ball powder and flake powder works best . check check, check again.
There are other suppliiers of bullets that are less expensive than Rocky Mountain.
JAMES Bullets .com maufactures powder coated 45 caliber for about 13 cents each if bought by the 1000.
These are coated , soft lead , bullets not copper jacked fmjs.
You will not experience any leading issues as long as velocities are kept normal.
X-treme Bullets is a good source if you prefer copper plated bullets, slightly more expensive at 14 cents per bullet
I have used thousands of each and am pleased with both.
Prefer the powder coated ones because the copper plated ones will deposit copper in the barrel where as the powder coated ones don’t.
After you get set up and gotten some under your belt, look into Dillon Precision for your next press. You won’t be disappointed.
In response to Smiley,
Before going the Dillon progressive press route, take a good lok at the Hornady Lock & Load progressive.
The Hornady was designed many years after the Dillon press came out and they solved a lot of the little drawbacks of the Dillon press. (Shellplate size is much larger on the Hornady, the ease of removing a case from the shell plate, and the ability of quick changing the dies..)
Either press is very good as is manufacture support, but really I suggest not going progressive until you are consuming 5000 rounds of any caliber per year. The equiptment cost really doesn’t justify it.
For my big bore rifles , which i shoot a couple of hundered rounds a year the single stage press works fine, or if you want to upgrade one level , try a turret press.
Yep… for precision loading of rifle rounds a single stage press is the way to go… OTOH, for relatively larger quantities of rifle and pistol rounds a solid progressive system is the way to go… since I am invested in Dillon before Hornady’s entry into the space I have a limited view. Of course, do research and, make sure what one settles on has “legs” and proven support. Thanks for making me aware of Hornady!